

One of the major differences between Nintex Workflow for SharePoint Server and Nintex Workflow for Office 365 (online) is that the latter does not support third-party workflow actions. This means that, while The Muhimbi PDF Converter for SharePoint on-premise includes a wide array of workflow actions for Nintex workflow, The Muhimbi PDF Converter for SharePoint Online cannot take advantage of these in the same way.
Now, this doesn’t mean that you cannot use Nintex Workflow for Office 365 with The Muhimbi PDF Converter for SharePoint Online, it just means that when authoring Nintex workflows, the editor will not automatically show Muhimbi’s custom workflow actions.
Muhimbi has an excellent article on how to use Nintex Workflow for Office 365 to Convert and Merge documents, you may want to read that before continuing as it provides a great background for the rest of this article.
The workaround linked to above works very well, but embedding the REST based Conversion logic in business workflows can be time consuming. As an alternative you may want to consider using Component Workflows as described in Nintex’ excellent “Stop Repeating Work” post.
Before you begin, please make sure the following prerequisites are in place:
- Muhimbi PDF Converter for SharePoint Online is installed and enabled in your workflow’s site with a free, full, or trial subscription.
- A Muhimbi PDF Converter SERVICES Online subscription, linked to the SharePoint Online subscription.
- Appropriate privileges to create Nintex Workflows.
- Working knowledge of SharePoint Online, REST APIs and Nintex Workflow.
This blog post is divided into two parts:
- Part One, create a ‘Convert to PDF’ Nintex Component Workflow.
- Part Two, use the ‘Convert to PDF’ Nintex component in a simple list workflow.
So let’s begin with Part 1 – Create a ‘Convert to PDF’ Nintex Component Workflow
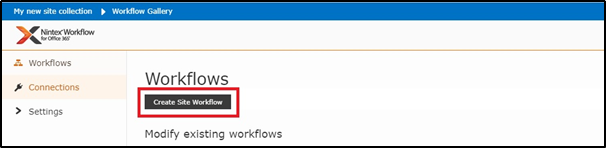
Step 1: Component workflows are built at the Site Workflow level. Navigate to ‘Site Contents’, click on Nintex Workflow for Office 365 and Create a Site Workflow.
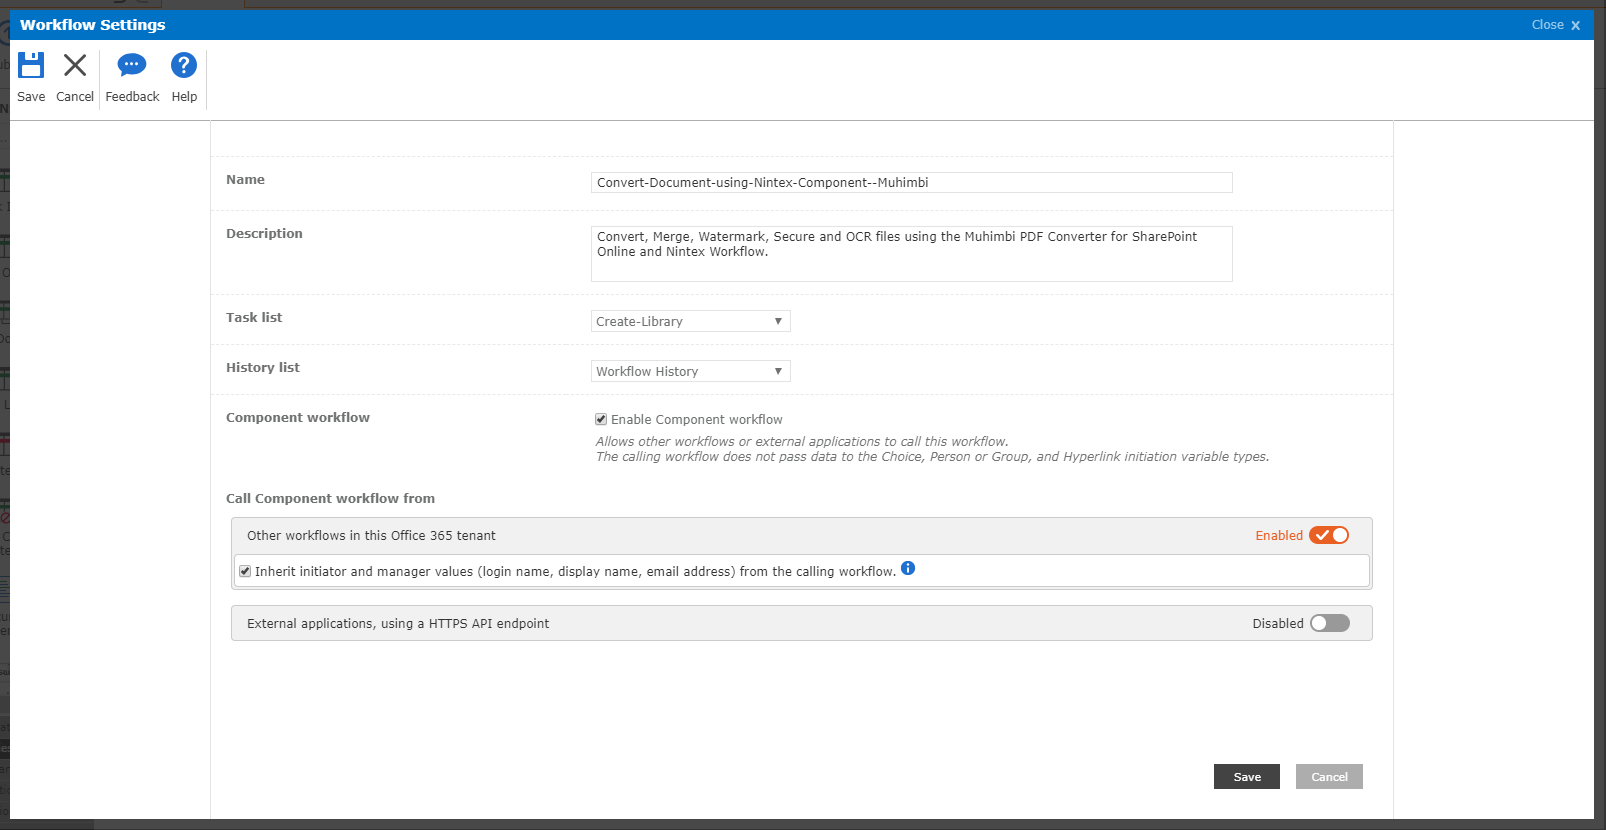
Step 2: Navigate to Workflow Settings in the Nintex Workflow ribbon. Give your component workflow a name, check the Enable Component workflow checkbox and click on Save.
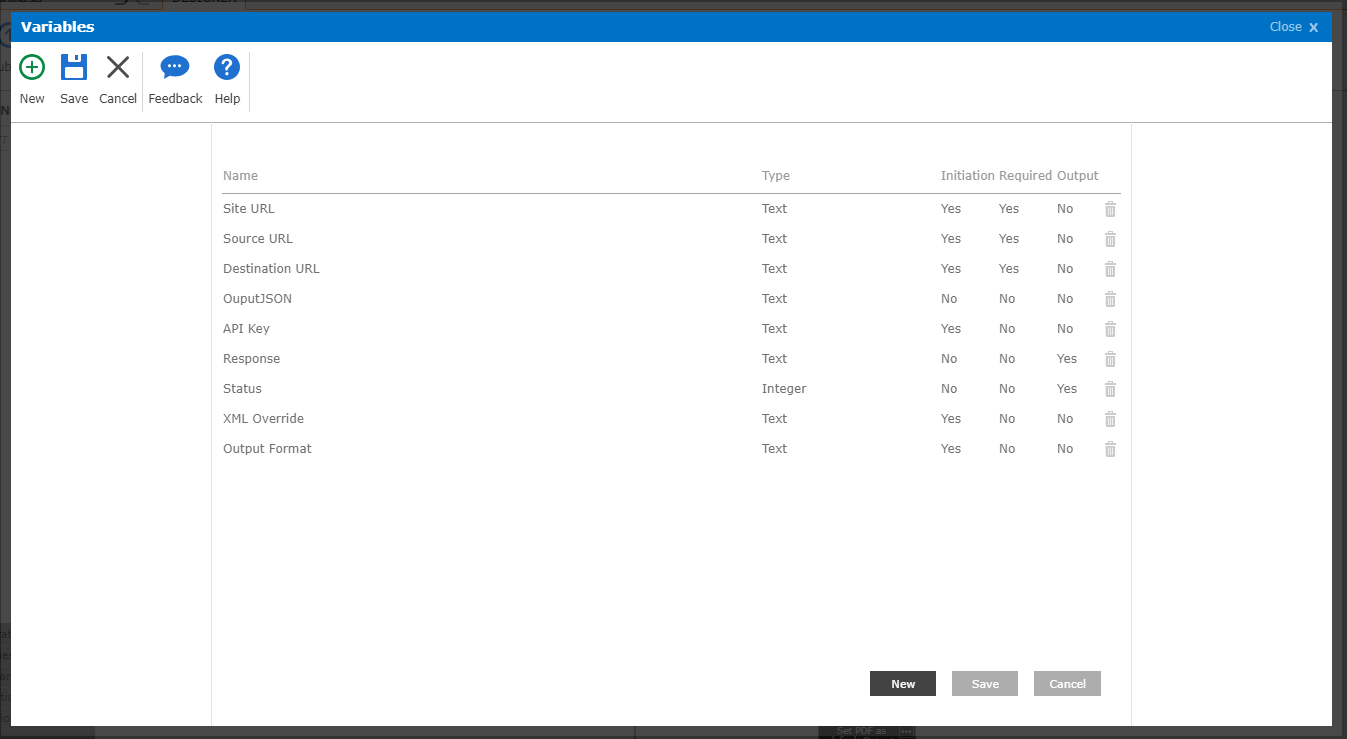
Step 3: In this step, we need to define the variables. However, the options presented in component workflows are slightly different than in a normal workflow.
In Component workflows there are two types of variables.
- Initiation variables: These allow you to pass input parameters from a parent workflow to the child.
- Output variables: These feed a response back to the parent as an output variable.
Please create the variables with reference to the screenshot below.
Before we proceed to the next step, a quick read through The Muhimbi Blog will provide a great overview of The Muhimbi PDF Converter and it’s integration with Nintex Workflow.
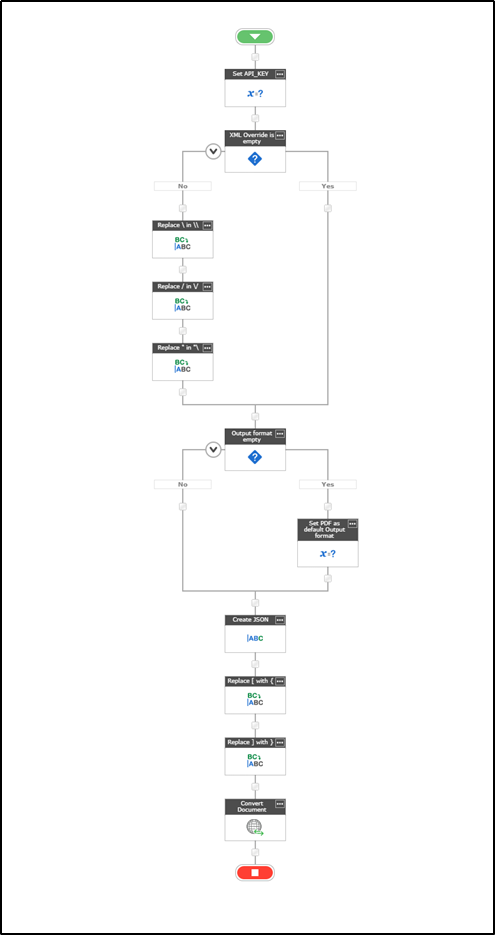
From a high level our workflow will look as follows:
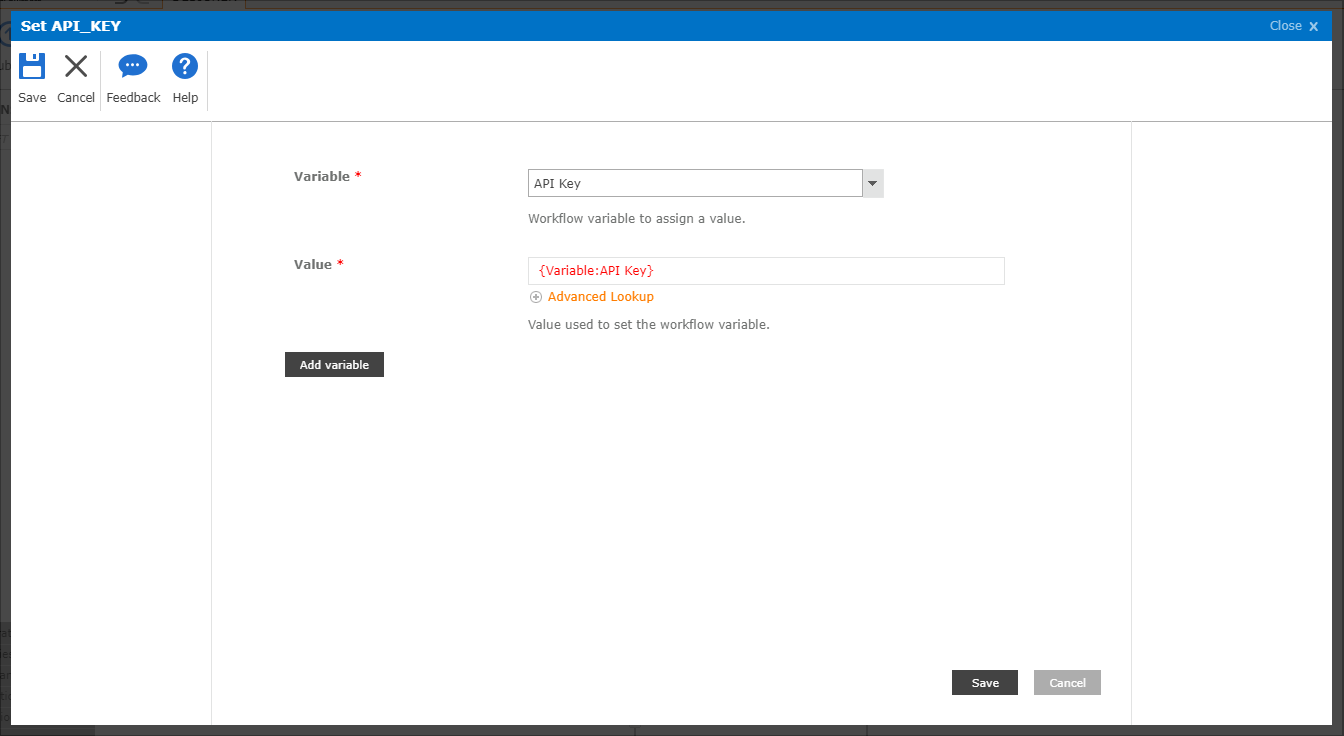
Step 4: Add the “Set Workflow Variable” action and Add the {Variable:API Key}.
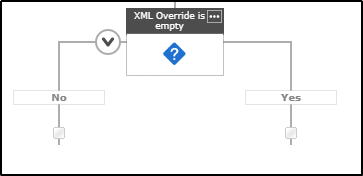
Step 5: If the XML Override variable is Empty, do nothing (Skip to Step 6) or perform the Steps below to escape the JSON string.
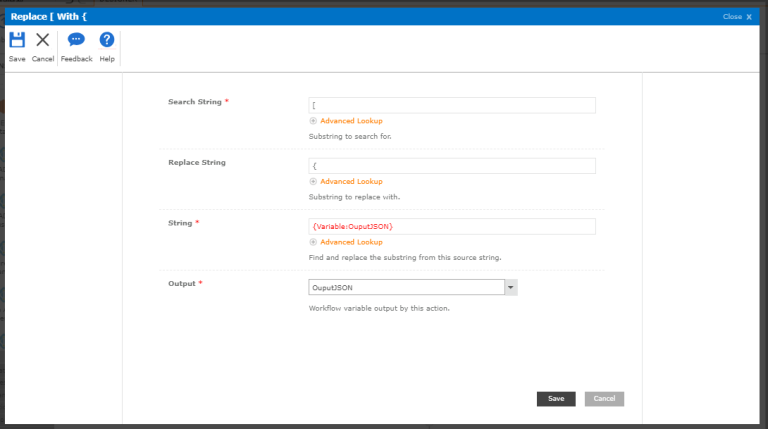
Step 5.1: Add the “Replace Substring in String” action to the Nintex design canvas and configure the action with reference to the screenshot below.
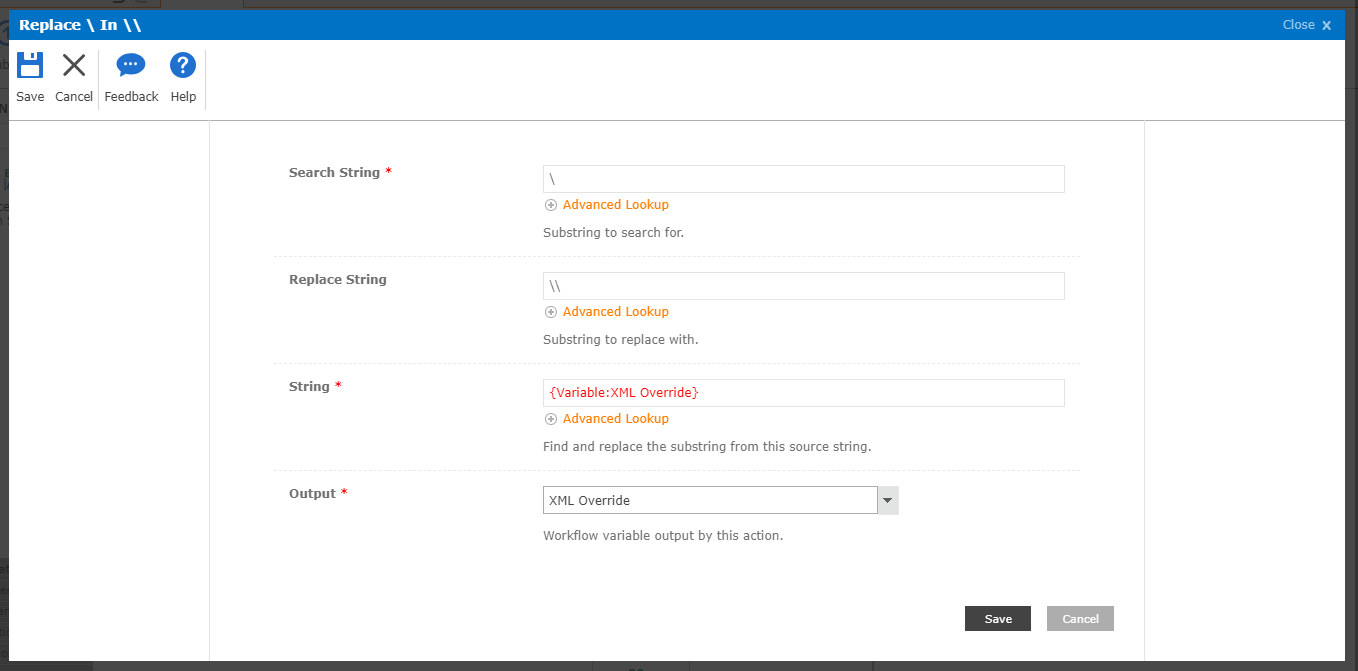
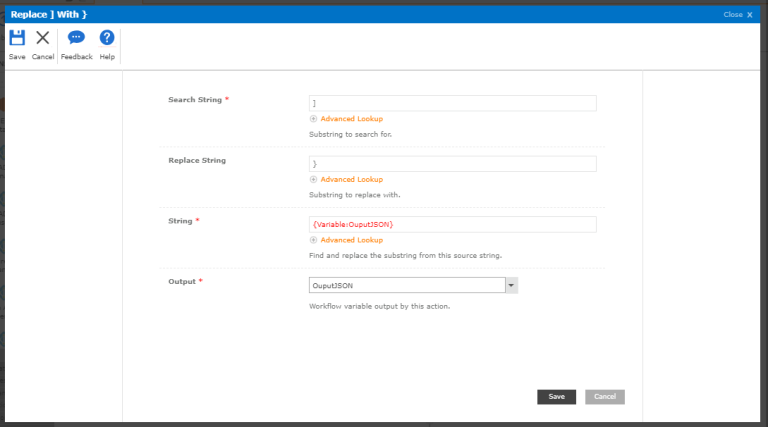
Step 5.2: Add the “Replace Substring in String” action to the Nintex design canvas and configure the action with reference to the screenshot below.

Step 5.3: Add the “Replace Substring in String” action to the Nintex design canvas and configure the action with reference to the screenshot below.

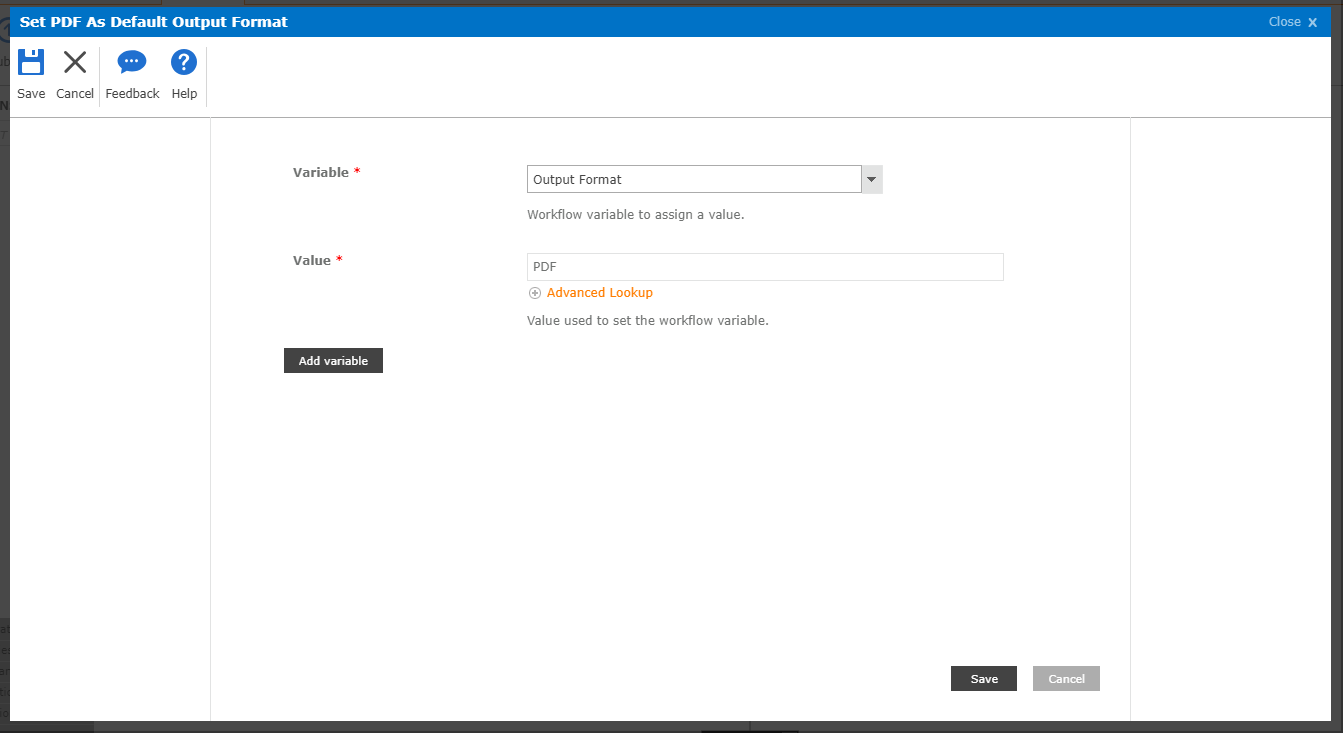
Step 6: If the “Output Format” variable is not empty, do nothing and skip to Step 7 or set the output variable to “PDF”.
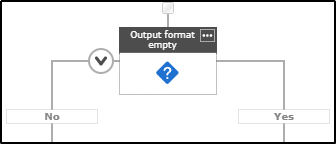
Step 6.1: Set the “Output Format” variable to “PDF”.
Step 7: Add a ‘Build String’ action and set the Output to the OutputJSON variable. In the String field enter the following.
[ "sharepoint_file": [ "site_url":"{Variable:Site-URL}", "source_file_url":"{Variable:Source-URL}", "destination_file_url":"{Variable:Destination-URL}.pdf" ], "output_format":"PDF", "override_settings":"{Variable:XML Override}", "fail_on_error":true]
Note: You may be familiar with JSON notation, but please note that we have replaced the curly braces – { } – with square brackets [ ]. This is due to a bug in Nintex Workflow for Office 365. For more details see the “PAY ATTENTION TO” section in this article.
Step 8: Add the “Replace Substring in String” action to the Nintex design canvas and configure the action with reference to the screenshot below.
Step 9: Add the “Replace Substring in String” action to the Nintex design canvas and configure the action with reference to the screenshot below.
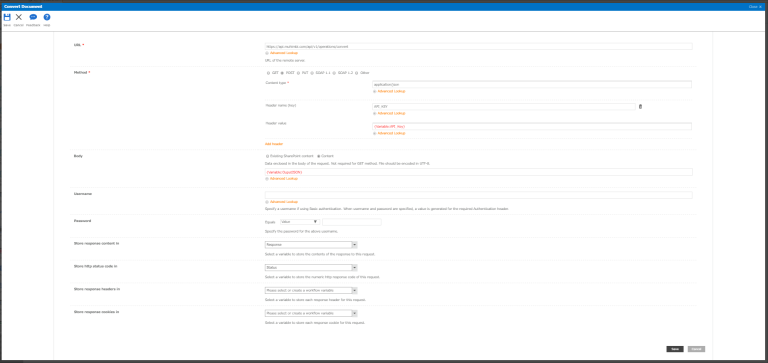
Step 10: Insert the “Web Request” action and configure it as follows:
- URL: https://api.muhimbi.com/api/v1/operations/convert
- Method: POST
- Content type: application/json
- Add header: Click Add header, specify API_KEY as the Header name and insert a reference to the API_KEY workflow variable for the Header value.
- Body: Select the Content option, add a reference to the JSON workflow variable in the Data field.
- Store response content in: Response.
- Store http status code in: Status.
Click the Save button.
Your Nintex Component Workflow is now ready so you just need to “Save and Publish” the workflow.
The workflow above is available for download as well. Just Import it in Nintex Workflow for Office 365 (Site-Workflow), SET THE API KEY, publish it and you are ready to go.
Now that we have our Component ready, let’s start with Part 2: Use the Convert to PDF component to create a simple list workflow.
Note: Once a component workflow is published and you’ve selected the relevant Start options, you now have the option to select the new Run Component Workflow action.
Step 11: In the Library tab, in the ribbon, click the down-arrow for Workflow Settings and then select Create a Workflow in Nintex Workflow.

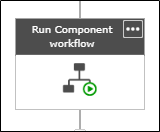
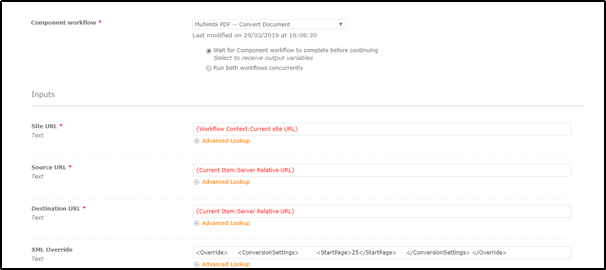
Step 12: Add the “Run Component workflow” action and configure it with reference to the screenshot below.
Save and Publish the Workflow.
- Component Workflow: Select the Nintex Component Workflow from the Drop Down.
- Site URL: Use the Advanced Lookup button and set URL of the associated site.
- Source URL: Use the Advanced Lookup button and set the URL of the associated item.
- Destination URL: Use the Advanced Lookup button and set the URL of the associated item. You can also specify the different Library.
- For details about how to specify in and output paths, see this.
- XML Override: Overriding default Conversion Settings when converting documents in SharePoint. For detail see this.
Note: Although both Nintex Workflow for Office 365 and the Muhimbi PDF Converter are mature services, in workflows like this one, there are a lot of ‘moving parts’. Custom generated JSON, customer-specific API keys, paths to document libraries, etc. The first time you create a workflow like this, some troubleshooting is bound to be needed. The First Step of troubleshooting would be to Log the “Status” and the “Response” variable to the workflow history list.
For details on troubleshooting see the “Troubleshooting” section in this article.
Thanks for reading..
