Create Work Items in Visual Studio Online with Nintex Workflow 2010


Userlevel 6
Badge +12

Hello again - 


I posted this question a while back and abandoned it as I was pulled in a different direction sad.png

Alas, I have returned and wanted to post my finding about it in the hope that I can save some people hours of banging their heads against their desk!


The Scenario

Simply put, I want to create a User Story in a project within Visual Studio Online. I want a user to fill out a form and then pass that information over into VSO. This is to be used for a web support team as a request form and queue for updates/changes to internal websites.


The Setup

Before we dive in, as always, lets take a minute to understand what we want to do and what we need to do.

  • Build a form to collect data
  • Build a workflow to pass data 


Simple, right? 


I do recommend that you take a look at the following sites as reference if you are unfamiliar with Visual Sudio APIs:

Getting Started: Auth Overview

Creating Personal Access Tokens

Creating Work Items


I am going to assume you have a basic understanding of Nintex Workflow 2010, and more specifically the Web Request Action, but if not, check out Nintex Help - Web Request.


The Visual Studio Parts

In order for this to all work, we need to make sure that the web service call has the proper authorization to create the work items in our project. To do this, we will create a Personal Access Token. Simple navigate to your Visual Studio Online environment and from the homepage open your profile and click on "Security".

205155_pastedImage_6.png

Next you will want to Add a Personal Access Token. This will generate a unique key that you can set to expire as well as what scope it pertains to:

205156_pastedImage_7.png

205157_pastedImage_8.png


Once you have the key (be sure to copy and paste it somewhere because you cannot view it again after it is gone) you will need to encrypt your token in Base64 so that you can use it in an HTTP Header (which is what we will do).


When encoding your token, do not forget your login! So for example, it will look like this:

{yourVisualStudioUserName}:{YourPersonalAccessToken}

jmchargue@duqlight.com:yourpersonalaccesstoekngoeshere


When you encrypt it, it turns out like this:

am1jaGFyZ3VlQGR1cWxpZ2h0LmNvbTp5b3VycGVyc29uYWxhY2Nlc3N0b2VrbmdvZXNoZXJl


Once you have that setup we can move into the Nintex side of things happy.png


The Nintex Parts

I am not going to go over the form because I want to focus on the "how we connect Nintex Workflow to VSO".

You can make the form anyway you want with any data points and controls you see fit. Here is my form (no extras added):

205154_pastedImage_2.png


I know its is not pretty, but we are going for functional! The workflow is where the magic happens so lets dive into that.

At the core, we want to leverage a Web Request action. I use some other actions to help set variables (query user profiles, etc), but the focus is on the Web Request.

You will want to use a PATCH and point your web request action to your project within Visual Studio:


PATCH https://{instance}/DefaultCollection/{project}/_apis/wit/workitems/${workItemTypeName}?api-version={version}


Your headers will be as follows:

Content-Type: application/json-patch+json
Authorization: Basic {YOUR Base64 ENCRYPTED USERNAME:TOKEN}


Lastly, you will want to add your request body. For this example, I am creating a User Story and this is the body:

[        {               "op": "add",          "path": "/fields/System.Title",          "value": "{ItemProperty:Title}"     },     {               "op": "add",          "path": "/fields/System.Description",          "value": "{WorkflowVariable:var_FN} {WorkflowVariable:var_LN} <div>{WorkflowVariable:var_Email} </div><div>{WorkflowVariable:var_PhoneNum} </div><div>Description: </div><div>{ItemProperty:Description}</div>"     },     {          "op": "add",          "path": "/fields/System.AssignedTo",          "value": "{WorkflowVariable:var_assignedTo}"     }]‍‍‍‍‍‍‍‍‍‍‍‍‍‍‍‍‍‍‍‍‍‍‍‍‍‍‍‍‍‍‍‍‍‍‍‍‍‍‍‍‍‍‍‍‍‍‍‍‍‍‍‍‍‍‍‍‍‍‍‍‍‍‍


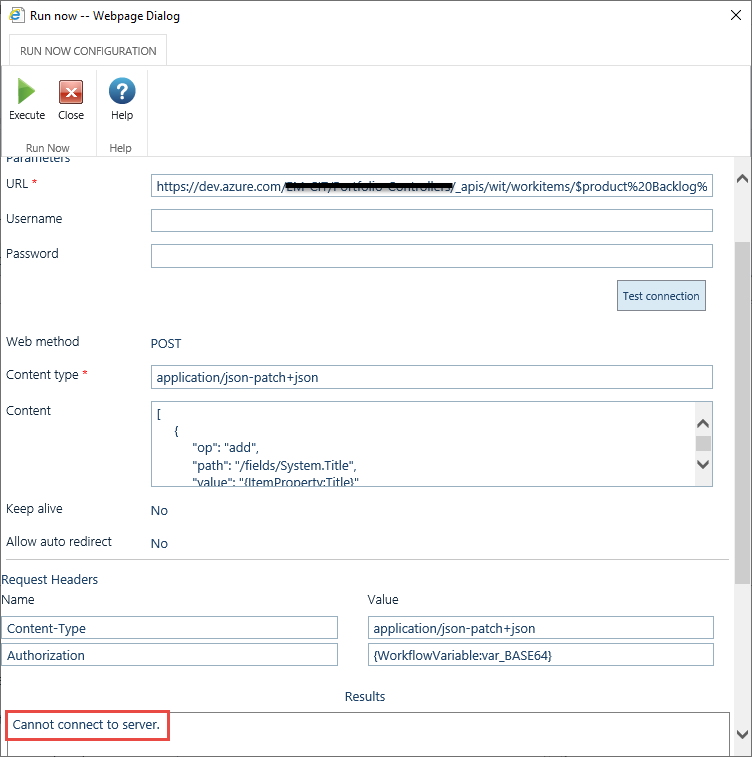
Web Request Action Sample:

205365_pastedImage_2.png


Run Now:

205364_pastedImage_1.png


I recommend that the first time you simply try to create an item with a title so you do not get hung up on all the other properties. I have had some success with doing a "Run Now". I would recommend using it, but I use Fiddler or Postman to remove any issues that SharePoint may present. More on that later.


Results

Now that we have everything in place, let's create one and see it go through!

Form (I had someone else fill it out to test permissions at the same time happy.png):

205158_pastedImage_16.png


And here it is in Visual Studio:

205159_pastedImage_18.png


It works (yay)!


Final Thoughts

I recommend doing this in Postman or Fiddler first so that you can understand how the web service work and hammer out the syntax. I spent countless hours attempting to connect to realize I left off the "username@domain" from my access token... yea... it happens.


Also, using Postman or Fiddler allows you to operate outside of SharePoint. We ran into issues trying to get the call to go out of our network... more wasted time, but figured it out in the end. Knowing that it works in one place can help determine issues and causes.


Next I want to recreate this in Office 365. I would like to use Nintex Workflow Cloud, but did not see a Web Request action yet.


Hope this helps, and as always, until next time!


16 replies

Badge +5

This is going to be so awesome once I get it to work! I have made it through encrypting my access token but now i'm a bit confused on how the Nintex action should be set up. I picked the Integration > Web Request action. Can you take a screenshot of what yours looks like?

Userlevel 6
Badge +12

Yes once I get in tonight I will see if I have some in my notes. If not I'll grab some and post them. Anything specifically that doesn't makes sense?

Userlevel 6
Badge +12

‌ - 

I updated the blog with my screenshots that I had in my OneNote. If you need anything else, let me know!

Keep in mind that the screenshots show a different body request than is stated in the blog, just a heads up

Badge +5

Okay so i followed your screenshot and tried to do a Run Now within Nintex. I received the following error: "The header must be modified using the appropriate property. Parameter name: name."

Also, when i click the "Test Connection" button it says there's an unexpected error. 

Could it be that my URL to my project is wrong ? I followed your formatting for it. Is there a place within my project where i should be able to copy it exactly?

Nintex to VSO

Userlevel 6
Badge +12

When I "Test connection", it will generally fail because it does not have the credentials that would be passed through in the header.

Have you tried to do it through Fiddler or Postman? If possible, I would publish the workflow in a test environment and try to run it as normal. This would help pin-point if it is the syntax or an actual connection issue (can't communicate to the services).

Badge +5

I'm fairly new to this type of work so I'm learning as a I go. I've downloaded Fiddler so now I just need to play with it to see what it can do! 

Side question: Since i have the access token from VSO, do you think there's a way to keep an open connection between the SharePoint list and the VSO project so that when an item is closed/resolved in VSO, it's updated in SharePoint?? Just a thought!

Userlevel 6
Badge +12

If going the other way (VSO to SP), you would need to leverage the service calls for SharePoint. Something like UpdateListItems(), but that would be a separate call. You would not want to keep a connection open and wait for a certain action. Unless you  are simply creating/updating an item in VSO and then want to update an item in SharePoint, you would approach that as another action within your workflow (after your web service call).

Badge +1

Have you any idea how to encrypt the token? I already got token but stuck on how to encrypt it.

Thanks

Badge +1

Hello Jesse McHargue ,

I'm Ice, my team also use Visual Studio to do project.

After I took a look at your content and found out it's really useful.

I tried to follow your steps above and run here is the result; 'Request failed with status: Not Found.'

There are some points that I got doubt, appreciate if you could help clarify.

1. which link should I input in Nintex URL field? currently, I input my TFS Product backlog page.

2. when you mentioned;
   'You will want to use a PATCH and point your web request action to your project within Visual Studio:

PATCH https://{instance}/DefaultCollection/{project}/_apis/wit/workitems/${workItemTypeName}?api-version={version}'

do I have to input any specific link there?

Please see below attached picture for my Web request action setting.

Here is the result after press Run now and Execute:

Badge +5

Honestly, I don't remember but I think i just used a website like this one to do it for me - Base64 Decode and Encode - Online . 

Userlevel 6
Badge +12

You can use anything that will transform the token to Base64. 

For this, I used the TextWizard that is in Fiddler

What Asad Kizzie‌ mentioned above, Base64 Decode and Encode - Online , will work as well.

Hope this helps!

Badge +1

Hello @jesse_mchargue ,

It's me again. Recently, I just finished applying Nintex workflow to create item in Visual Studio (TFS board).

As I followed your demonstration, using web method 'PATCH' it modified my current workitem.

So, I went with web method 'POST' instead but else remain the same. 

The result is impressive, now I can automate creating Work item feature in Visual Studio by running Nintex workflow in Sharepoint. :D

Thanks for the idea and motivation.

Userlevel 6
Badge +12

Excellect @Ice_Sinsab 

I am glad you got it working for what you needed! Always cool to see how others are using Nintex to automate their processes :)

Hello @jesse_mchargue ,


I am successfully able to create work items in tfs from Nintex workflow. Thank you for your guidance! Have you been able to successfully transfer attachments that a user includes from the form and transfer it to the pbi that was created?


Thanks!

Userlevel 6
Badge +12

@bounce1200 - 


I did not do anything with the attachments that were added to the item. I am not sure what is possible, but most likely there is a way!


You may need to create the work item in VSO and then subsequently copy the attachments into the newly created item. Just a thought.


Badge +1

Hello @jesse_mchargue ,


It's me again. Now Microsoft launch Azure DevOps and I would like to integrate Nintex with that cloud platform as well.


I followed the same guideline for creating Token and created URL instance as same as what Microsoft provided:


POST https://dev.azure.com/{organization}/{project}/_apis/wit/workitems/${type}?api-version=6.1-preview.3


Ref: Work Items - Create - REST API (Azure DevOps Work Item Tracking) | Microsoft Docs


But there is error message as below:


"Cannot connect to server"


Have you any idea what might caused this problem?


My colleague assume that there must be Sharepoint Proxy configuration in order to let it connect to external website.


I'd love to hear your thoughts.


Thank you


Reply