
As you would recall in our last blog post - A day in the life of the Automation Jedi (Part 1) we were able to design a process map for Mr Happy's automation feedback requirements, if you haven't had a look at it, never fear its located here
...I assume you're all caught up now, and well across our little ballad between Mr Happy and Mr Grumpy.
To start automating Mr Happy's automation requirements, we're going to use Nintex Workflow Cloud (NWC) - What is Nintex Workflow Cloud you ask? NWC allows Mr Grumpy to automate his business and transform any business process, no matter how sophisticated– using clicks, not code.
To do this he'll need an NWC account, for those tuning in at home, if you don't have one you can sign up for one here.
Now, that we all have an account – let’s login to NWC!
This is Mr Grumpy’s story;

Once Mr Grumpy has logged into NWC using his credentials, he selects the Create workflow button (the red box in the left-hand top corner.)
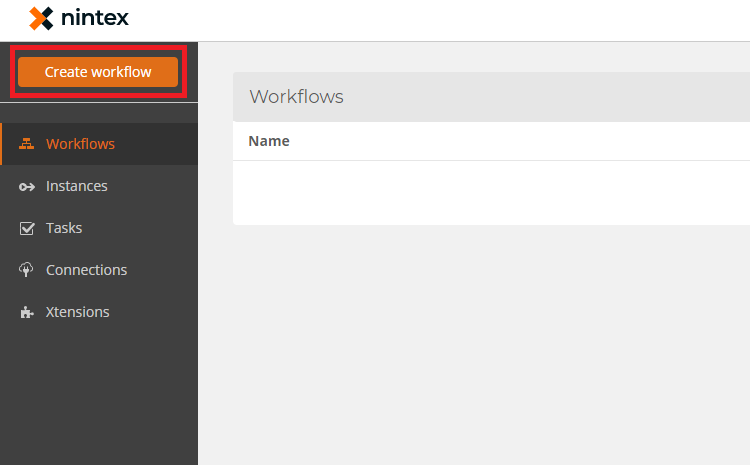
Item 1 - NWC Entry screen
After the page loads, Mr Grumpy will need to create the client-facing form which kicks off the workflow and the subsequent process (Procedure 1.0 in the process map.)
Mr Grumpy begins the form creation process for the client feedback form, this is done by the following steps:
- Click the Start event to open the form configuration.
- Select Nintex in the Connector field.
- Select Form in the Event field.
- As this is a client-facing form, as such, we need to give form access to anyone, this is done by selecting Anyone with the form URL
- And then, click the Design Form button.
Item 2 - Configuring the start event form in NWC
At this point, Mr Grumpy can start building the client feedback form to start the process. For this form, he will require a few form controls from the Form's designer - these are located on the left-hand side:
- Text Short- to capture our client's name (Text - short 1)
- Email- to capture our client's email address (Email 1)
- Choice - Single- to allow the client to select the store location (Choice - single 1)
- Text Long- to capture the client's feedback (Text - long 1)
And, because Mr Happy requested we brand the form with the company logo, Mr Grumpy is also going to use:
- Image- to add the company logo to the form
Once we've snapped the controls onto the form's canvas it should look like this:
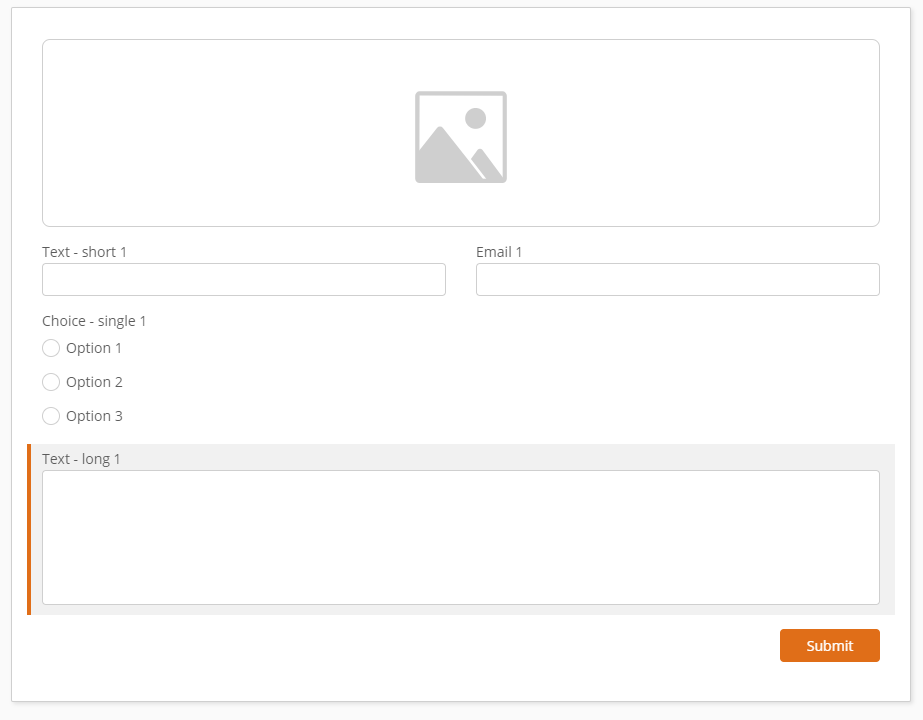 Item 3 - The unconfigured client-facing form
Mr Grumpy now needs to modify the controls above to align the details that need to be captured - specifically labelling the controls so it makes sense to the clients completing the feedback forms. To do this, Mr Grumpy selects any of the controls mentioned above and changes the title field to reflect the content he wishes the end-user to input.

Item 4 - The configured client-facing form
Now that Mr Grumpy has created the form it's now time for him to start bolting the workflow together following Mr Happy's Process Map - located here.
First off, he will need to run the comments field in the feedback form through Azure Cognitive Services. (Procedure 2.0 in the process map.)
About Cognitive Services:
In this example, the goal of Azure Cognitive Services is to help the organisation understand feedback provided through the text comments in the form. The Cognitive Services API then returns a numeric score between 0 and 1. Scores closest to 1 indicate positive sentiment, and scores closest to 0 indicate a negative sentiment.
Using this microservice will allow Mr Happy to get an understanding of which clients are unhappy when completing and submitting their feedback forms.
However, out of the box Cognitive Services isn't a selectable workflow action (available in the workflow actions on the designer canvas.)
To overcome this, Nintex Xtensions allows you to create a relationship with the Cognitive Services API's. In doing this, the action is then available within the workflow canvas designer via a connector.
Once the connector for Cognitive Services is added, Mr Grumpy is then able to drag the action onto the canvas and configure the comments to be analysed against the Cognitive Services API.
Item 5 - Snapping Cognitive Services onto the form Canvas
Mr Grumpy can now refer back to the procedure within Promapp and find out what's next (Procedure 3.0 in the process map.)
He needs to configure the workflow to send Email Feedback sentiment to the client.
Mr Grumpy wants to ensure that the client receives an email regardless of the feedback sentiment. However, Mr Grumpy will need to route the emails depending on the sentiment outcome - If some clients embody Mr Grumpy, we want to ensure they receive an email different to those who are more aligned to Mr Happy.
To do this, Mr Grumpy will use a Branch by Condition action which directs his workflow along one of two paths, if Cognitive Services calculates that the feedback to be less than .05 (50%) it will branch to the right (Yes) and have a custom message for negative sentiment - the red box below. Otherwise, the workflow will branch to the left (No) as the feedback is over 51% and we can assume the feedback is positive. As a result of that, the client will receive a positive sentiment email notification.
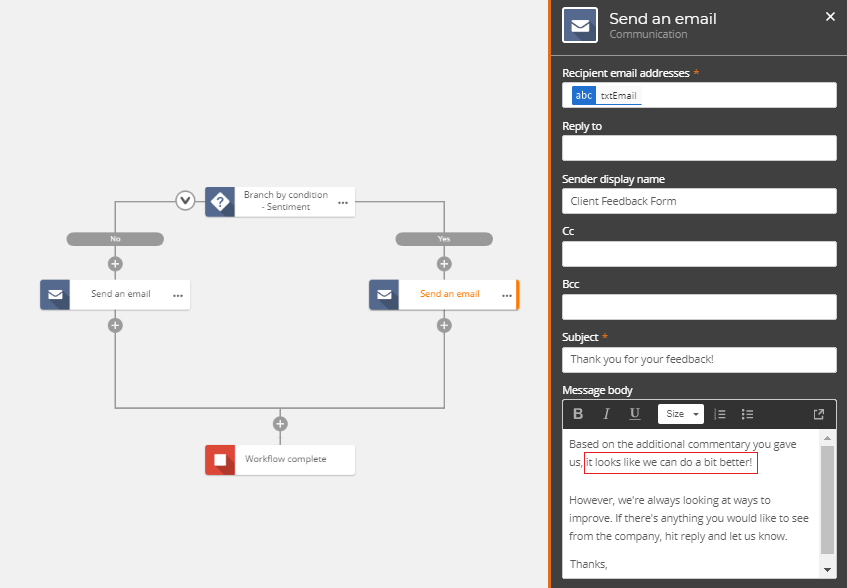
Item 6 - The Conditional Branch and Send an Email
Mr Grumpy now needs to take the information captured within the client-facing form and the analysed sentiment to produce a templated document using Document Generation.
Mr Grumpy drags the Generate Document action onto the canvas (Procedure 4.0 in the process map.) Using this action retrieves placeholder-tagged templates (strings of text that let you specify where in a generated document a variable value should be placed, when a document is generated, the tags are replaced with the value of the variable) and places content from the Client facing form, Cognitive Services connectors to create the finalised document.
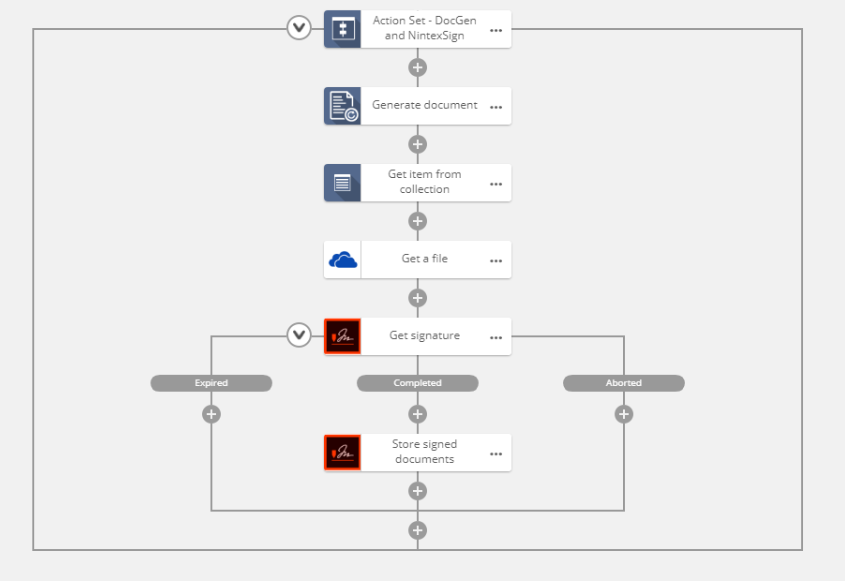
Item 7 - The workflow includes Document Generation and Nintex SIgn
This removes the old approach Mr Happy used which was manually reviewing the feedback, typing out the comments from the feedback form and then emailing the manager these details to review.
Item 8 - Document Generation sample
Once the Document Generation action completes, Mr Grumpy needs to ensure the Manager receives the document and more importantly, they electronically sign to acknowledge the feedback (Procedure 5.0 - 7.0 in the process map) to complete this task Mr Grumpy is going to use Nintex Sign.
Nintex Sign is an electronic signature technology used to capture e-signatures from recipients and to store signed documents, powered by Adobe Sign.
The outcome of using these actions allows not only Mr Grumpy to route the document to the Manager for electronic signature but also ensures the document once signed is filed for long preservation in the correct long term preservation location.
Lastly, to finalise this automation project, we're going to publish this project and then also create a QR code to start the form from the client-side. To do this we're going to use Quick QR Code Generator.
This allows us to take a photo of the QR code which enables feedback to be processed via mobile devices easily and quickly:
Item 9 - Using QR Code Generator and the URL start form

Item 10 - QR Code for the clients to start the form
And with a few actions dragged onto the workflow canvas, Mr Happy's process map created in Nintex Promapp is now an automated workflow utilising NWC's drag and drop canvas, along with a client-facing QR code to start the whole process. (The QR code works, go on... check it out!)
This previously painstakingly manual process has turned into an automation dream…. No interpretation of “doctors handwriting” no emails, just pure process flow that lets technology take care of the chasing and enable you to focus on what matters… customer feedback.
For those wanting a copy of the workflow, please contact me via Mathew.Johnson@Nintex.com
I have included the Document Generation Template as an attachment.
In part 2.2 I will cover the Workflow Generator.
TIll next blog post.
Mj.
Credit
Image from: https://www.deviantart.com/percyfan94/art/The-Mr-Men-Show-Logo-190463441
