
Using the Entire Nintex Stack… In one automation project. Sounds daunting, doesn’t it?
With three simple blog posts, I will break down the Nintex solution stack into three core elements, and more importantly, show you that an automation project is rather easy.
In this series, you will be shown how to:
- Effectively create and map processes important to your organisation
- Easily build forms and workflows to the processes you have
- Integrate RPA into legacy platforms and existing systems.
In doing so, you will see different parts of the Nintex Offering, they are as follows:
- Nintex Promapp (Part 1)
- Nintex Workflow Cloud and The Workflow Generator aka the "Magic Button" (Part 2)
- Nintex Foxtrot (Part 3)
And the best part? At the conclusion of this series, you will have your own copy of this to test in your own environment.
To Automate, or Not To Automate. That is the question
Over the last 12 months we’ve seen that "Automation" has taken the industry by storm, everyone is talking about it, blogging about it (Yes, I'm doing the same right now) and more importantly, people are now proudly sharing how amazing their automation projects are!
Now, let me tell you a little tale about a sprightly Technical Business Analyst called “Mr. Happy” and his not so happy, IT Administrator “Mr. Grumpy…”
This is Mr. Happy’s story;

Mr happy had been thinking about feedback forms, specifically feedback forms from their unhappy clients and how they can route this negative feedback to the correct Manager.
Then, that lightbulb moment occurred……."I can automate this!" time for me to become an Automation Jedi!
With the automation idea fresh in his mind, he painstakingly scribes this idea down in a Business Process diagram, and after a few hours, various frustrations and a few less hairs on his head it’s done.
What’s Mr. Happy’s Idea you ask?
To electronically capture feedback from his clients - specifically focusing on negative feedback and being able to route this feedback to the appropriate Manager
- For all negative feedback, it is required the Manager is to acknowledge such feedback through viewing a complied document with the feedback and then signing off against this via electronic signature.
- Finally, ensure this content is being stored in the correct long term preservation repository – In this example, we are going to use SharePoint Online.
It was time for Mr. Happy to take this idea to his IT Administrator, who would magically whip this automation project together with the snap of his fingers…
The only issue, like with most organisations, his IT Administrator was "Mr. Grumpy".

After Mr Grumpy's review, the Business Process diagram Mr. Happy made didn't make sense – It was far to business-focused which Mr. Grumpy didn't understand.
It also left Mr. Grumpy with more questions than answers. To make matters worse, he wasn’t able to provide direct feedback to Mr. Happy on his newly created process diagram.
The alternative and Mr. Grumpy's recommendation to overcome this issue - a tool he’d never heard of called "Promapp."
Mr Grumpy's reason, he wanted the organisation to use a simple, easy to use process mapping tool, which assisted in:
Cutting waste with lean tags - Simple navigation, dashboard and process ownership tools make it intuitive and easy to use. ‘Processes I’m in’ filter creates a personalised experience. Most importantly, simple one-click process editing.
Real-time feedback and collaboration - Personalised ‘My changes’ dashboard, with one-click process feedback and changelogs, encouraging team member’s engagement.
Process health at a glance – Mr. Grumpy can get real-time process health summary with team engagement tracking and automatic tracking of processes. It also includes function-by-function comparisons and benchmarking.
After a few hours of training from his Lead Process Champion, Mr. Happy is now skilled up to use Promapp on his own.
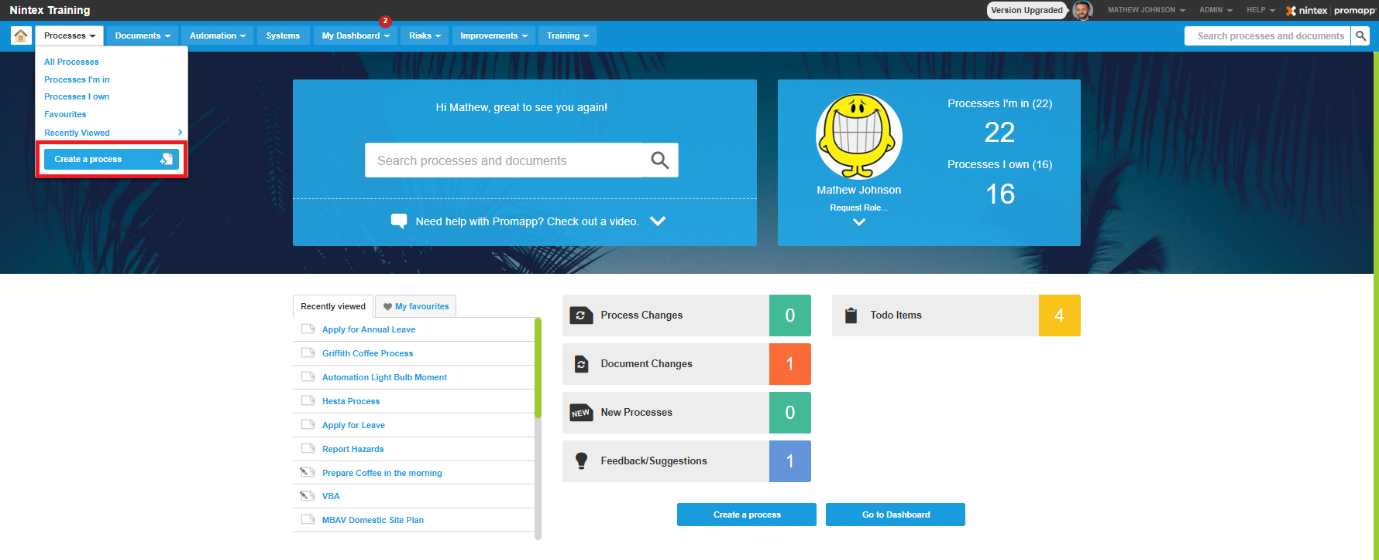
The first thing he would need to do is create a new process. (Now for those tuning in at home that don’t have a Promapp login, never fear - click here to sign up to a free trial.)
After logging into Promapp, Mr. Happy needs to Create a process: the red box below.
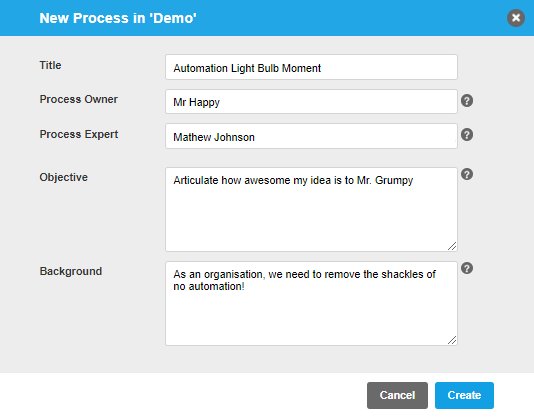
Upon selecting Create Process; he can name the process, identify who will own the process day to today, the process Subject Matter Expert (SME), what will the process achieve and why is this process needed?
After selecting Create, we are shown the below screen:
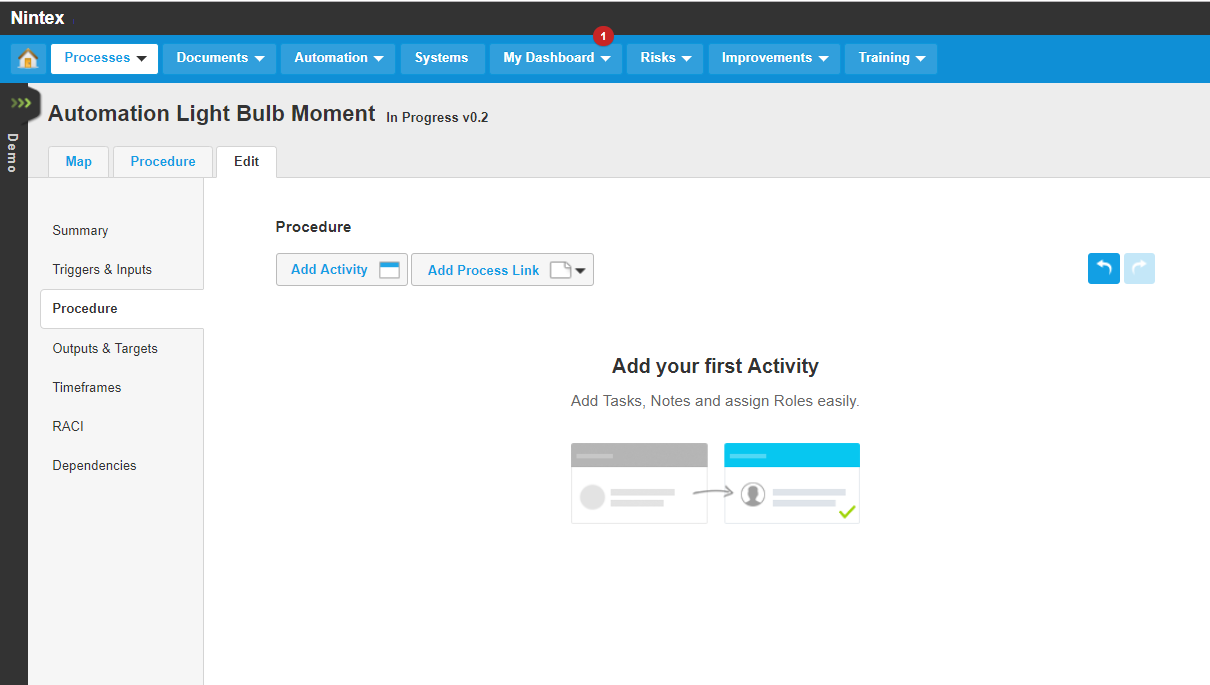
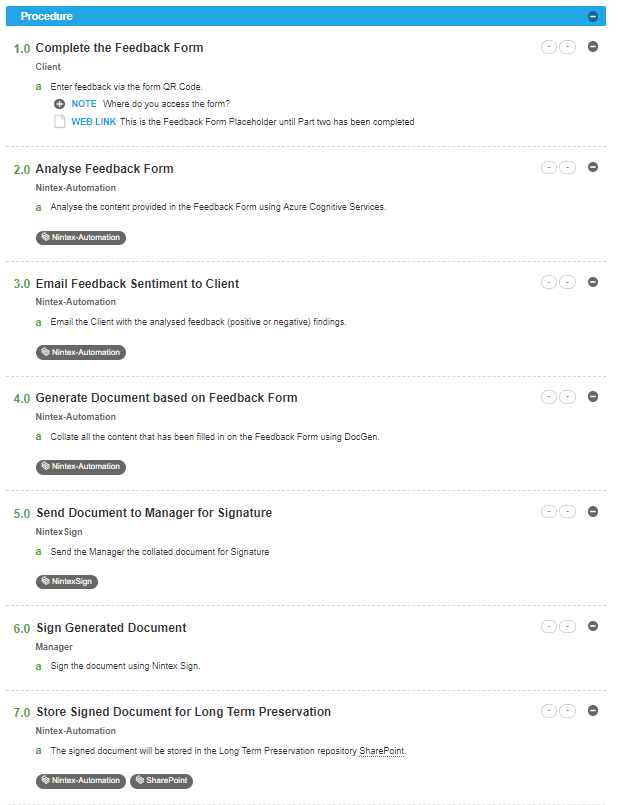
In here, he is able to define the activities within this process map: he describes the first activity (and the others to follow suit) as well as the role of whom will be responsible for the various activities.
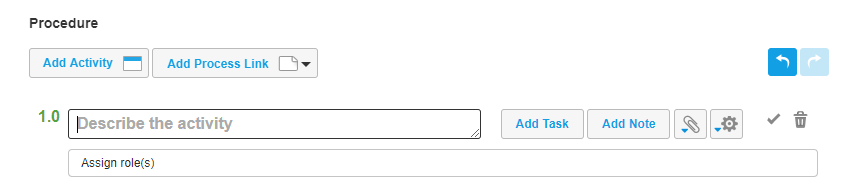
In the procedure, he can also add things such as:
- Tasks which relate to the activity – he should start all Task descriptions with a verb e.g. Enter feedback via the form QR Code.
- Notes can also be added to the Activity – he needs to ensure all Notes title a question.
- Documents can either be imported into Promapp and stored in the Promapp database or Promapp can link to documents stored within your organisations' document management system or on a network drive.
- References such as Weblinks can also be included in the process to directly link to any valid URL.
Once he’s added the various activities and published the Procedure - it will look something like this:
PROCEDURE:
MAP: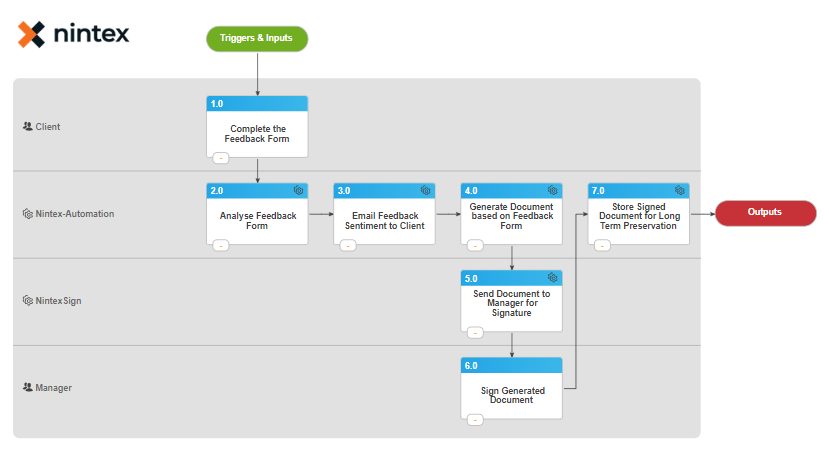
As you can see from the above-published outcomes in Promapp, Mr. Happy can include as much context around the process as he wishes, this goes above and beyond just a generic process map.
It allows anyone in his organisation, with little to no interaction with the process, a comprehensive go-to guide which not only maps out the process but also outlines the appropriate stakeholder(s), allows notes to be added to the process tasks, instructions, additional documents, instructional videos, the context is endless – if you have the content within the organisation it can be leveraged in the map.
With this Process Map now completed (which you can view here), he can take this idea back to Mr. Grumpy for review.
This time round, Mr. Grumpy has the direct link of where he can view this via the Share Process Link (the link above) and more importantly, it has all the content specific to the process.
Lastly, he can directly post feedback or contribute improvement ideas to this process instead of, well... you know how the story goes… being a Grump.
For more details about Promapp and the additional functionality, I would suggest jumping over to wknowles22 Blog Post Promapp is your BEST Friend - Which covers the Promapp solution (or tool) in greater detail.
In the next blog post, we will take Mr Happy’s Process map, create his Feedback Form and the Workflow using Nintex Workflow Cloud and also cover off the new feature, Workflow Generator.
For those wanting a copy of this - I have also included the .xps as an attachment.
Till the next blog post,
Mj.
